Showing posts with label snack. Show all posts

Tuesday, 30 June 2015

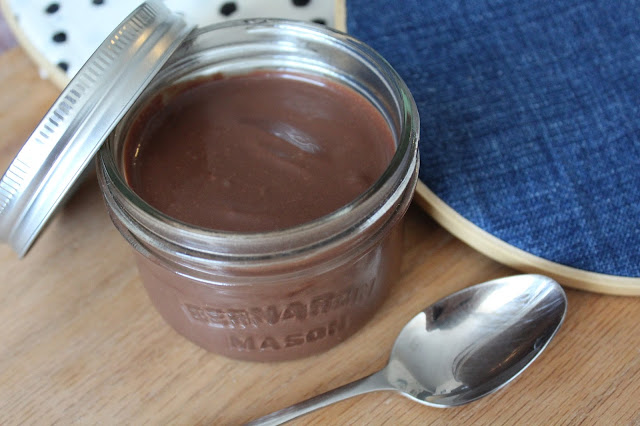
Tofu Chocolate Pudding

     Chocolate heaven. As much as I love greens, and boy have I been getting a lot of them lately with my CSA from Rye's HomeGrown, it's always nice to escape the jungle that is my fridge with a smooth and decadent chocolate delight. I initially created this recipe for a food demo for one of my nutrition classes, aimed at getting vegetarian children to eat more protein, considering the nut-free policy of most elementary schools these days. And based on the reviews I received, you'll love this pudding and so will your children (or anyone else's children). Because tofu is so dull it takes on whatever flavours you add it to, in this case it just tastes like chocolate, which makes me very happy. 


     I've tried a couple different ways of making tofu chocolate pudding. Making it with just cocoa powder isn't quite decadent enough, not enough fat. I found that when I used just chocolate chips, it was a bit too fatty. Or perhaps I just felt guilty using that much chocolate chips. Either way, I find that using a combination of chocolate chips and dutch cocoa powder is just perfect. 


     This recipe is rather simple compared to dairy based chocolate puddings, the hardest thing you'll have to do is melt some chocolate, which can either be done with in a double boiler, or if you are lazy like I often am, you can even do it in the microwave. 

Time: 15min (+1h)
Serves: 4-6

Ingredients

  • 1 package silken or soft tofu, drained
  • 2/3 cup (120g) semi-sweet chocolate chips or quality dark chocolate
  • ¼ cup (30g) cocoa powder, unsweetened
  • ¼ cup maple syrup
  • ¼ cup water
  • 1 Tbsp soy milk

Preparation

  1. In a double boiler or a large glass bowl over a pot of boiling water, melt chocolate with cocoa powder, maple syrup, water, and soy milk, stirring regularly.
  2. Meanwhile blend silken or soft tofu in blender until smooth, alternatively this can also be done with an immersion blender.
  3. When the tofu is smooth and the chocolate mixture is melted, add the chocolate to the tofu in the blender, and blend on low to combine.
  4. Transfer to a storage container or serving bowls, and refrigerate for at least one hour before serving.
  5. Serve with fresh raspberries and coconut or shaved chocolate.
Try serving it with raspberries and fresh shaved coconut, it's a delicious combination!

Monday, 16 June 2014

Morning Glory Muffins

 A.K.A. banana-carrot-apple/pear-coconut-raisin muffins


It seems that every time I talk with my dad, he complains that he wants my mom to bake him something. He was a bit jealous when I told him I made these muffins. They've got pretty much everything he loves in them: carrots, raisins, coconut, banana and nuts. Can you ask for a more tasty way to start off your morning? 


Serves: 12 muffins

Ingredients

1 large banana, mashed
3/4 cup soy milk or other non dairy milk
1/2 cup vegetable oil
1 tsp vanilla extract
1/3 cup brown sugar, packed
1/4 cup white sugar

2 cups flour, half whole wheat, half white
2 tsp baking soda
1 tsp ground cinnamon
1 tsp ground ginger
1/4 tsp salt

1 large pear or apple, pealed and chopped
1 cup grated carrot
1/2 cup shredded coconut (sweetened or unsweetened up to you, I've used both)
1/2 cup raisins

1/2 chopped pecans for topping

Preparations

1. Preheat the oven to 350°F. Grease a muffin tin, or line with muffin liners (Do not need to grease if using a silicon muffin tray).
2. In a large mixing bowl, mash banana and mix with all wet ingredients and sugar.
3. In a separate bowl, mix flour, baking soda, spices and salt.
4. Add the dry ingredients to the wet and mix to combine.
5. To the batter, add the chopped fruit, grated carrot, raisins and coconut and mix well.
6. Distribute the batter evenly, top the muffins with the chopped pecans and place in your preheated oven at 350°F.
7. Bake for 30-35 minutes. Remove from the oven and let cool for 5-10 minutes in the muffin tray before transferring the muffins to a wire rack and cooling for an additional 5-10 minutes before chowing down.


Wednesday, 14 May 2014

Coconut Apricot Bars

       On their own, these tasty Coconut Apricot Bars are a great breakfast or snack option. They are not too sweet but with the addition of a scoop of vanilla or coconut ice cream on top or a sprinkle of icing sugar, these bars also make an excellent dessert. 

       The base of the bar has heart healthy omega-3 and omega-6's from the flax as well as fiber from the whole wheat flour. The topping is filled with chopped apricots, almonds and pecans, as well as a coconut caramel-like sauce. These coconut apricot bars are a healthy alternative to traditional "Magic Bars". Just as tasty, but use a lot less sugar and use better fats. Saturated fat from coconut products contains short chain fatty acids, which unlike their animal product competitors are not processed the same way and are less likely to clog up you arteries.       


Serves: 12 large dessert size bars (3"x3") or  24-36 medium-small bars


Ingredients

Base:
1/2 cup margarine
1 tbsp molasses
1/2 cup packed brown sugar
1 tbsp ground flax seed 
3 tbsp water
1/8 tsp ground ginger, heaping
3/4 cup white flour
3/4 cup whole wheat flour

Coconut condensed milk:
1 can coconut milk
2/3 cup brown sugar, packed

Topping:
1 cup sweetened shredded coconut 
1 cup dried chopped apricot*
1 cup chopped nuts, a combination of pecans and almonds or your favourite
2/3 cup Ritz crackers, about 12-15, chopped or lightly crushed*

optional: icing sugar or vanilla or coconut ice cream   


Preparation

1. Turn on the oven to 375°F and toast nuts for 8 minutes while the oven is preheating and lightly grease 13x9 inch pyrex pan. 
2.To make the base, beat margarine with brown sugar, ground flax seed, water, molasses and ginger and then mix in the flour. Pour into the greased pyrex pan and press with your fingers, bake for 10 minutes at 375°F. 
3. In a small sauce pan combine the entire can of coconut milk and the packed brown sugar. Simmer on medium-low heat for 12-14 minutes, stirring occasionally so that the condensing coconut milk doesn't boil over. If a thin film forms, whisk it back into the condensed coconut milk. Final product should be a medium thick milk of a light caramel colour.
4. Combine coconut, apricot, nuts and Ritz crackers in a bowl.
5. Pour 2/3  of the prepared coconut condensed milk on top of the baked base, this should cover the majority of the base.
6. Evenly distribute the coconut, fruit and nut mixture on top and drizzle remaining coconut milk mixture on top of this layer.
7. Bake at 375°F for 20-25 minutes, the coconut milk should be golden brown around the edges.
8. Chill completely (~2h) before cutting.
9. Eat as is for a snack or for breakfast. If serving for dessert, add a scoop of vanilla or coconut ice cream on top of a large square cut bar or dust a fine layer of icing sugar on top before serving.  

*if particularly dry, can be soaked in a bit of water for a couple of minutes
*if you like sweet and salty desserts, you can use Ritz original, otherwise use low sodium Ritz crackers

Wednesday, 11 September 2013

Peanut Butter Cups

School's back in session and we can all use a mid-week pick-me-up, so behold: chocolate peanut butter cups. If you've had Reese's peanut butter cups, you know what to expect. But these tasty cups may exceed you expectations. 
I make my peanut butter cups with dark chocolate chip, but feel free to use any chocolate you wish. As for the peanut butter, use natural peanut butter, or a similar product without all the added sugar which can make your peanut butter cups cloyingly sweet.


Makes: 12 cups (so make sure you've got 12 paper muffin cups on hand)


Ingredients


1 cup creamy natural peanut butter
1/2 icing sugar
1 1/2 cup chocolate chips
1/8 tsp salt (optional, but makes them taste better)


Preparation


Melt chocolate chips either on low heat on the stove top or in a microwave.
Spread half the melted chocolate evenly around the sides and the bottom of the 12 muffin cups. I find this can be done easily with a small spoon if you hold the muffin cup in you hand and spin it while spreading the chocolate around.
Place the paper muffin cups in a muffin pan and place in the freezer for a minimum of 20 minutes.
While the chocolate is hardening  in a small bowl cream the peanut butter with the sugar (can be sifted to avoid sugar chunks, unless you are too lazy like me) and salt. If the mixture is a bit stiff due to stiff peanut butter, you can add a dollop of margarine to the mixture.
In hardened-chocolate cups, distribute the peanut butter mixture evenly, spreading it flat with a spoon or by banging the muffin pan on the counter.
Refreeze the peanut butter cups for about 20 more minutes before spreading on the top layer of chocolate.
After all the chocolate has been smoothed out, refreeze the peanut butter cups for 1 hour.
Store in the freezer afterwards and let them thaw for a few minutes before nibbling.
Enjoy!


Sunday, 28 July 2013

Fresh Blueberry Muffins

Wow, it's been a while since I last posted. You'd think that I'd have more free time during the summer, but I've been working so much that I have even less time to cook than I did during the school year. On my last day off, I whipped up a tasty batch of blueberry muffins with some banana to change them up a bit. 

They turned out great! They were super moist from the banana and super tasty from everything else we put in them. And not to brag or anything, but they are good for you too: each muffin is packed with fruit and contains only about 3% of your daily fat and sodium.

Feel like a little nutrition lesson? 

One Tim Hortons classic Blueberry Muffin has 570mg of sodium, which is 38% of the sodium you need in a day, based on your Adequate Intake. 570mg of sodium equates to a 1/4 tsp of salt - that's in every muffin. I used that much salt in my entire batch of muffins! So one of my muffins has just less than 3% of your daily sodium. Now, I'm using Adequate Intake because that is the ideal value that you should be basing your diet on. But Nutritional Facts tables, like the one on your cereal box, base their percent daily value on the Upper Tolerable Intake Level (UL), which is the maximum daily intake.The UL for sodium is 2000mg; the Adequate Intake is 1500mg. This means that if you follow the Nutritional Facts tables, you could be consuming a lot more sodium than you need.

A Nutritional Facts table would tell you that your Tim's Blueberry Muffin only has 28% of your daily sodium, when in fact is has 38%. This is a problem. In Canada, over 85% of males and about 75% of females have sodium intakes above the UL, putting them at a higher risk of high blood pressure, hypertension, heart disease, obesity and cancer -  they don't include those warnings on Tim Hortons muffins, but maybe they should.  When in doubt, cut the sodium out. 

Speaking of which, here's my recipe:

Bake at: 375°F
Makes: 12-16 muffins

Ingredients


2 cups fresh blueberries, washed (~1 pint)
1 tbsp flour

1 ripe banana, mashed
1 tbsp ground flax seed with 2 tbsp water
1/8 cup vegetable oil
1 cup white sugar
2 tsp vanilla extract
2 tbsp vinegar
2 tsp baking soda

1 cup white four 
1 cup whole wheat flour
1/4 tsp salt
1 1/2 tsp baking powder

1/3 cup soymilk or other milk

Preparation


Preheat the oven to 375°F.
Wash blueberries, then toss in 1 tbsp of flour to coat and set aside. 
In a medium mixing bowl, mash the banana then add the ground flax and water and let the mixture sit for a couple of minutes while you measure out the rest of the ingredients. Next add the vegetable oil, sugar, vanilla, vinegar and baking soda to the banana-flax mixture and mix well.
Mix the dry ingredients together, then add this to the wet mixture and fold it in gently.
Incorporate the soy milk into the mixture until smooth, then add the blueberries.
Grease a metal muffin tray, or use muffin cups or a silicone muffin tray. Evenly distribute the batter in the muffin tins.
Bake at 375°F for 20-30 minutes.

Great for breakfast or a snack!


Thursday, 27 June 2013

Peanut Butter Cookies

 It's been a very long time since I've had peanut butter cookies, probably since before I left home. But for some reason, I've always remembered peanut butter cookies being on the harder side of the cookie scale.  Well not these ones. These peanut butter cookies are super moist and super delicious. 
Since these cookies are made with flax, they have the added benefits of omega-3 and omega-6 fatty acids. And essential fatty acids in my cookies means I can justify having a third.


Makes: 32 cookies

Ingredients


2 cups brown sugar, lightly packed
1 cup margarine
1 cup natural, smooth peanut butter (No sugar added)
6 tbsp water + 2 tbsp ground flax
1 tsp vanilla extract
3 cups of flour
1 tsp baking soda
1/2 salt
white sugar for dusting

Preparation


In a jar or measuring cup combine water and ground flax, let sit for at least 3 minutes until the mixture thickens.
Meanwhile, in a large mixing bowl, cream together brown sugar, margarine and peanut butter.
Stir in the water flax mixture and the vanilla.
Add the flour, baking soda and salt to the batter, and mix until well combined.
Cover with plastic wrap and let sit in the fridge for at least 2 hours.


Preheat oven to 350°F.
Remove the batter from the fridge, and form golf ball size balls.
Roll the batter balls in white sugar (optional). then place on a lightly greased baking sheet.
Place the dough balls a few inches apart, then squish down with a fork.
Bake at 350°F for 12 minutes.
Remove from the oven and let rest on the baking sheet for an additional 5 minutes before transferring to a wire rack.
Let cool completely before eating.


Wednesday, 15 May 2013

Tasty Tropical Fruit Muffins


One of Ryan’s favourite muffin recipes from his mom. Muffins are perfect for the morning; they are fast, easy and nutritious.


Vegetarians and vegans need to be especially cautious of B12 deficiencies, which is why I like to add the optional nutritional yeast to this recipe. The nutritional yeast doesn't affect the texture or flavour of the muffin at all, but it’s a great way to incorporate some additional B vitamins into your diet. Nutritional yeast is an excellent source of vitamin B12 and also thiamine. If you decide to add the ½ cup of nutritional yeast, each muffin would have about 50% of your daily Vitamin B12 plus a bit extra depending on the fortification of your soymilk.

Bake at: 400°F
Bake Time: 25 minutes
Makes: 12 muffins

Ingredients


1 cup all-purpose flour
1 cup whole wheat flour
2 tsp baking powder
1 tsp baking soda
¼ tsp salt
½ cup shredded coconut, unsweetened
½ packed brown sugar
(Optional: 1/2 cup nutritional flakes)

1/8 cup water
1 cup soymilk, or other variety of milk
1 cup mashed banana (2-3 bananas)
¼ cup melted margarine
2 tsp vanilla
1 can crushed pineapple, juice removed

Preparation


Preheat oven to 400°F.
Combine all dry ingredients in a large mixing bowl.
In a separate bowl, combine all wet ingredients.
Pour wet ingredients into the dry bowl and stir until moistened.
Spoon muffin batter into a greased pan or a silicone muffin tray.
Sprinkle about a handful’s worth of extra coconut on top of the muffins.
Bake for about 25 minutes, until golden brown and the cake tester comes out clean.
Enjoy for breakfast or for a snack!

Wednesday, 2 January 2013

Vegan Spinach Dip

     The first spinach dip I don't feel guilty (or sick) after eating! Yippee to one of my favourite holiday dips! I used a firmer tofu the first time I made it, however, a softer tofu, like medium, is ideal for a silkier, more traditional spinach dip. Pumpernickel is an obvious accompaniment but crackers, chips or veg also pair well. 


     And in case you're wondering, meat-eaters love this dip too.

Ingredients

  • 1 Package medium or softtofu
  • 2 Tbsp olive oil
  • 1/2 tsp black pepper
  • 1 tbsp vegetable bouillon powder, low sodium
  • 2 tsp basil, dried
  • 1 tsp garlic powder
  • 2 Tbsp nutritional yeast
  • 1 Tbsp soy sauce
  • 2 1/2 Tbsp lemon juice
  • 1/2 large or 1 small onion, finely minced
  • 15 kalamata olives, pitted and chopped (about 1/4 cup)
  • 1 can water chestnuts, chopped
  • 1 package (10 oz) frozen chopped spinach, defrosted and drained 

Preparation

  1. Drain tofu of all excess liquid and place in large bowl with oil. Use a hand mixer on high or an immersion blender to combine until creamy.
  2. Add pepper, bouillon, basil, garlic powder, nutritional yeast, soy sauce, and lemon juice. Mix for 1 minute.
  3. Add onion, olives, water chestnuts and mix with a hand mixer or fork (do NOT use immersion blender) until combined.
  4. Adjust seasoning as desired.
  5. Let cool for at least 2 hours, but the longer, the better.


Tuesday, 1 January 2013

Chipotlé Mexican Mania

Living in Toronto, we quickly learned to love Chipotle Mexican Grill. Their burritos and bowls are the best. Fresh ingredients, loads of vegetables - what's not to love? Oh wait the price! We much prefer making our own at home! We've gathered and worked on a delicious guacamole, cilantro-lime rice and mexican black beans, all inspired by Chipotle's vegetarian fair. All the recipes are fresh, easy and delicious, so give them a try!


Serves: 4

Guacamole


  • 2 Hass Avocados, ripe and mashed
  • 1/2 jalapeno pepper, seeded and minced
  • 1-2 tbsp red onion, finely chopped
  • 2 heaping tbsp chopped cilantro (fresh)
  • 1/4 lime juiced or 2 tsp lime juice
  • 1/8 tsp salt or to taste


Mash avocado and then mix together with all other ingredients in a bowl and serve with chips or as a topping for burritos, bowls, tacos,... 


Cilantro lime Rice

  • 1 cup long grain rice
  • 2 cups water
  • 2 tbsp chopped cilantro
  • 1/2 lime, juiced or 1 tbsp+ 1 tsp lime juice
  • 1/8 tsp salt


Cook rice with two parts water in a rice cooker or on the stove in a medium sauce pot, following package instruction. 
When all water is absorbed, remove from heat and let steam for 5 minutes.
Mix salt and lime juice together and then add to the rice along with the cilantro.
Mix and serve.


Black Beans


  • 2 cans black beans, 1 drained, 1 undrained
  • 1 clove of garlic, minced
  • 1 tsp chili powder
  • 1/2 tsp cumin
  • 1/8 tsp asian 5-spice (or allspice)
  • 1/4 tsp sugar
  • 1/8 tsp salt or to taste
  • optional: 3 chipotles en adobo sauce, minced


Combine all ingredients in a small pot and stew over medium heat for around 30 minutes.


• Serve with lightly sautéed green peppers and red onions, cheese, lettuce and salsa on a large tortilla to make your burrito.
• If you prefer burrito bowls, as I do, layer the ingredients: rice, beans, sautéed green peppers and red onions, crunchy lettuce (ex. romaine), with salsa, cheese, and guacamole, grab a fork and dig in!


Saturday, 22 December 2012

Energy Balls

An excellent snack or addition to a dessert tray
I can't believe there are only 3 DAYS TILL CHRISTMAS! 
Well, It's been a while since my last post, but with exams behind me and the holidays much closer than expected, there are many recipes that I'll be posting in the next few days.
I'll be making a few recipes today, and I'm starting with some Energy Balls. These delicious little balls are nutritious with flax and oats, but are sweetened with honey and chocolate. They make great snacks (kids love them!), but can be served for breaky or even for dessert on a sweets tray. 


No Bake Energy Balls

Ingredients

1 cup oats (quick oats or old-fashioned, large flakes)
2/3 cup toasted coconut flakes
1/2 cup peanut butter
1/2 cup ground flaxseed
1/2 cup chocolate chips 
1/3 cup honey
1 tsp vanilla extract 

I used the bottoms and tops of cereal  boxes
and wrapped in christmas paper for an easy
christmas gifts. Just wrap the balls in wax
paper, tie with a bow, box and
give the gift of yummy goodness.

Preparation

Mix all ingredients in a medium mixing bowl and let chill in the fridge for 30 minutes.
Once chilled, roll into balls of desired diameter. 
Stored in an air tight.