Monday, 14 September 2015

Vegan Pumpkin-Beer Bread


     These past few days have been feeling very fall-like. Between classes back in session and the cool autumn breeze, and even the release of Pumpkin Spice Lattes at Starbucks (not that it's vegan appropriate) I figured I should re-post one of my favourite fall recipes. This Vegan Pumpkin-Beer Bread is one of my all-time favourite fall recipes.

     We made this last night and were very satisfied, once again. This bread is moist but hearty. If you made my chocolate zucchini bread last post, this bread is definitely more of a bread than a cake, I promise this time. This pumpkin bread is just subtlety sweet with pumpkin-pie like aromatics. It makes for a perfect breakfast or a snack for school or work.

     This recipe was inspired my a recipe on Slate. It's not vegan but you can check it out here

Serves: One 9-inch loaf, serves 12

Ingredients


  • vegan margarine for greasing the pan
  • 1 3/4 cup all-purpose flour,can use a mixture of white and whole-wheat
  • 1 teaspoon baking powder
  • ½ teaspoon baking soda
  • 1/8 teaspoon salt
  • 2 heaping teaspoons pumpkin pie spice OR
    • 1½ teaspoons ground cinnamon
    • ½ teaspoon ground ginger
    • Pinch ground nutmeg (optional)
    • Pinch ground Asian 5-spice (or allspice)
  • 3 tablespoons margarine
  • 1 cup pumpkin purée (a third of a can)
  • 1 cup brown sugar
  • 1 cup pumpkin ale, I suggest "St-Ambroise Pumpkin Ale"; alternatively, use mulled apple cider


Preparation

  1. Heat the oven to 350°F. With margarine, grease a 9" loaf pan. Combine the flours, baking powder, baking soda, salt, and spices in a large mixing bowl.
  2. In a medium sauce pan over low heat melt margarine. Stir in the pumpkin and brown sugar until smooth. Pour the pumpkin ale or cider into the sauce pan and mix until smooth. 
  3. Add the wet pumpkin mixture to the dry ingredients and mix until combined, then transfer the batter to the greased loaf pan.
  4. Bake at 400°F for 45 minutes to 1 hour. If you can smell the bread from the living room, it's probably done! Otherwise, bake until a toothpick inserted into the center of the loaf comes out clean. Let cool for 10 minutes in the loaf pan, then transfer to a wire rack to cool completely. Leftovers should be covered and stored at room temperature for up to 5 days, although I've never seen it last that long....its normally finished in 3 days.


Wednesday, 26 August 2015

Chocolate Zucchini Bread


       Zucchini is trending right now. Or at least we're pulling it from the garden in bushels full. Now as much as we try and harvest the zucchini's regularly so they don't grow to the size of a small child, there are always a few that you miss. Now when you have an irregularly large zucchini, there are a couple things you can do with in:

  1. Let it keep growing! and keep it for seeds. That is of course if it's the only squash you are growing (wouldn't want any cross pollination of summer squashes)
  2. Make some zucchini pizza (but you might want to remove some of the seeds)
  3. Make Zucchini Bread, my favourite version is a super moist chocolaty recipe that you can hardly call bread.
       There has been a bit of controversy over the title of this recipe. Now I am a firm believer that this is zucchini bread, a little sweeter than the traditional zucchini bread , but zucchini bread never the less. My coworkers unanimously decided that it was closer to a brownie (have the ever had a brownie?!). And then I get a 7am text from Ryan exclaiming that "It's cake! Best breakfast ever!" So we haven't really come to a firm agreement on what exactly the chocolate zucchini dessert/breakfast/snack is but nevertheless, it's delicious!


Serves: 2 loaf pans
Time: 30 minutes + 1 hour

Ingredients

  • 2 1/4 cups all-purpose flour
  • 1 cup unsweetened cocoa powder
  • 1 1/2 tsp (or 1/2 Tbsp) baking soda
  • 1 tsp baking powder
  • 1/4 tsp salt
  • 1 cup semi sweet chocolate chips (optional)

  • 2 ripe bananas, mashed
  • 1 cup vegetable oil
  • 1 cup packed brown sugar
  • 1 cup white sugar
  • 2 tsp vanilla extract
  • 500g (about 3 cups) grated raw zucchini

Preparation

  1. Preheat oven to 350°F/175°C. 
  2. In a food processor equipped with the grater or using a medium grater, grate a large zucchini.
  3. In a large bowl, whisk together all dry ingredients, including flour,cocoa powder, leavening agents, salt. Stir in chocolate chips if using.
  4. In another large bowl, mash banana, and whisk in oil. Cream oil and banana mixture with brown and white sugar and vanilla. 
  5. Add the zucchini to the wet mixture and mix well.
  6. Mix the wet and dry mixtures together, stirring just until combined. 
  7. Scrape the batter into two 9x5x3 loaf pans (I don't usually grease them, but mine are well seasoned). Bake in a 350°F/175°C oven until the bread has risen and a toothpick/chopstick comes out clean, about 45 minutes to 1 hour.
  8. Remove from the oven and place loaf pans on a wire rack to cool for 15 minutes before removing from the pans and letting cool completely. 

Monday, 3 August 2015

Zucchini Pizza


       This is one of my all-time favourite pizzas. It’s a classic in our house and is a great way to use all those zucchinis. It you grow zucchinis at home, you know what I mean. Once they start, you’re eating zucchini 24/7.


        This type of zucchini pizza is rift off of a traditional Italian pizza, but you know, veganized. We add sesame seeds and bread crumbs for a little bit of crunch to an otherwise deliciously soft zucchini filling.

Look at all those zucchinis Rye's HomeGrown is selling at the market!
Serves: 2-4

Ingredients

  • 1/3 pizza dough recipe, rested
  • 1 medium-large zucchini (large in grocery store varieties, otherwise medium from the garden)
  • Scant ½ tsp salt
  • ½ cup vegan shredded cheese, such as Daiya
  • 3 green onions, chopped thinly
  • ¼ cup fresh basil, sliced into ribbons
  • ½ tsp dried oregano
  • 2 cloves garlic, sliced paper thin or minced
  • Fresh cracked pepper to taste
  • 2-3 Tbsp sesame seeds
  • 1/8 cup bread crumbs


Preparation

  1. Preheat the oven to 550°F, with the pizza stone positioned on the center rack. If not using a pizza stone, see my recipe for the pizza dough recipe for how to prepare this recipe using a metal baking tray.
  2. Use a food processor with a grater attachment or a box grater to grate the zucchini (large grate).
  3. Toss grated zucchini in a bowl with salt. I know it seems like a lot of salt, but most of it will be lost in the liquid! Let stand for approximately 20 minutes, until the zucchini has released a good amount of water.
  4. Transfer zucchini to a colander. Discard any remaining liquid. In small batches, squeeze out the zucchini and then transfer back to the bowl.
  5. Loosen up the zucchini with a fork. Mix in cheese, green onion, basil, dried oregano, garlic and black pepper. Taste and season if needed.
  6. On a floured surface, stretch out the dough and transfer to a floured pizza peel with cornmeal.
  7. Depending on how wet your dough is, you can choose to make the pizza on the pizza peel or directly on the pizza stone. We make ours on the pizza stone after we had to turn our pizza into an extra-large calzone one too many times. But it’s up to you! Either way, you want to slowly slide the pizza/dough onto the stone.
  8. Bake at 550°F for approximately 10 minutes, then switch to broil and broil for 2 additional minutes. These times are based off of an electric oven, if using gas, less time will be needed, so adjust accordingly.
  9. When the crust and the bread crumbs are golden brown, remove from the oven and transfer to a wire rack or cutting board. Let cool for 5-10 minutes before cutting and serving.


Tuesday, 14 July 2015

Green Goddess Soup (Hearty Leafy Green Soup with Green Lentils)


       Last night I decided I hadn't had enough greens for the day, so I decided to make a soup PACKED full of greens. I figured I was better off making soup than turning the oven on to make a lasagna. My fridge was filled with a variety of greens from my CSA basket from Rye's HomeGrown. I've been loving my weekly helping of fresh veg. It's really cool. Every Wednesday I work a shift selling the produce at Ryerson's Farmers' Market, and I go home with my bike basket overflowing with local organic produce. We've barely had to do groceries these past couple of months, besides our staples.


      The trick to this soup is putting pretty much every green you have into it. Seriously, I put turnip greens, spinach, swiss chard, kohlrabi, and a bit of kale. (I had to use up last weeks bounty before I get more goodies tomorrow!) Throw those luscious greens with a delicious stock, some lentils, onions and potatoes, and you have yourself a scrumptious soup. And for those trying to watch their waste line, eating more greens is a great way to start. One 2-cup bowl of this hearty green soup will cost you under 250 calories (and it's totally worth every calorie).


       I topped  my hearty green soup with a mixture of microgreens from Rye's HomeGrown, including basil and cilantro microgreens along with pea shoots. So tasty!


Serves: 6-10
Time: 1h 10min

Ingredients


  • 2 Tbsp olive oil
  • 1/8 tsp red chili flakes
  • 2 medium-large onions, roughly chopped
  • 5 cloves of garlic, minced
  • 1 tsp cumin
  • 1/2 tsp coriander 
  • 1 cup green or french lentils
  • 4 cups water
  • 2 medium potatoes, diced
  • 1 medium kohlrabi bulb (about the size of a fist, alternatively use turnip or an additional potato)
  • 1 small bunch of swiss chard ( about 7-8 leaves), stems and greens separated and chopped
  • 3 green onions, chopped
  • 2 cups stock + 4 cups water or 1 bouillion cube with 6 cups water
  • 10oz/280g spinach, kale and/or turnip greens, stems removed, chopped 
  • Kohlrabi greens (or about 2oz/56g more greens, such as collard greens or kale), stems removed, chopped
  • 1/2 tsp salt
  • 1/4 tsp ground pepper
  • 1/3 cup nutritional yeast
  • 2-3 Tbsp fresh lemon juice


Preparation


  1. In a large soup pot or dutch oven, heat olive oil with chili flakes over medium heat. When hot add the onion.
  2. Let the onion saute for a couple of minutes before adding the minced garlic, cumin and coriander. Let saute for about 2-4 more minutes or until onions are transleucent.
  3. Next, stir in the dry lentils, add the 4 cups of water and cover. Raise the temperature and bring to a boil, then reduce heat and simmer for 10-15 minutes.
  4. Meanwhile chop the potatoes, kohlrabi (discard stems) and chard stems, and the rest of your greens.
  5. After 10-15 minutes, add the diced potatoes, kohlrabi and chopped swiss chard stems and let simmer for an additional 10-15 minutes before adding the greens.
  6. Add the chopped fresh greens in batches, stirring in between.
  7. Add seasonings, including salt and pepper, nutritional yeast and lemon juice. Let simmer for about 10 minutes before removing from the heat.
  8. Let cool for 5-10 minutes before serving with toasts, microgreens, sauteed mushrooms, whatever you feel like!


Tuesday, 30 June 2015

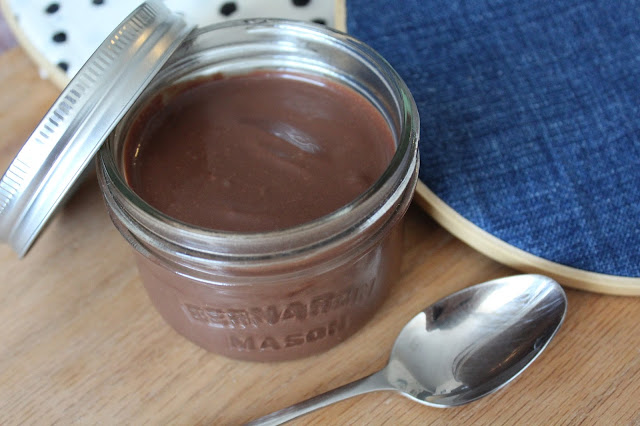
Tofu Chocolate Pudding

     Chocolate heaven. As much as I love greens, and boy have I been getting a lot of them lately with my CSA from Rye's HomeGrown, it's always nice to escape the jungle that is my fridge with a smooth and decadent chocolate delight. I initially created this recipe for a food demo for one of my nutrition classes, aimed at getting vegetarian children to eat more protein, considering the nut-free policy of most elementary schools these days. And based on the reviews I received, you'll love this pudding and so will your children (or anyone else's children). Because tofu is so dull it takes on whatever flavours you add it to, in this case it just tastes like chocolate, which makes me very happy. 


     I've tried a couple different ways of making tofu chocolate pudding. Making it with just cocoa powder isn't quite decadent enough, not enough fat. I found that when I used just chocolate chips, it was a bit too fatty. Or perhaps I just felt guilty using that much chocolate chips. Either way, I find that using a combination of chocolate chips and dutch cocoa powder is just perfect. 


     This recipe is rather simple compared to dairy based chocolate puddings, the hardest thing you'll have to do is melt some chocolate, which can either be done with in a double boiler, or if you are lazy like I often am, you can even do it in the microwave. 

Time: 15min (+1h)
Serves: 4-6

Ingredients

  • 1 package silken or soft tofu, drained
  • 2/3 cup (120g) semi-sweet chocolate chips or quality dark chocolate
  • ¼ cup (30g) cocoa powder, unsweetened
  • ¼ cup maple syrup
  • ¼ cup water
  • 1 Tbsp soy milk

Preparation

  1. In a double boiler or a large glass bowl over a pot of boiling water, melt chocolate with cocoa powder, maple syrup, water, and soy milk, stirring regularly.
  2. Meanwhile blend silken or soft tofu in blender until smooth, alternatively this can also be done with an immersion blender.
  3. When the tofu is smooth and the chocolate mixture is melted, add the chocolate to the tofu in the blender, and blend on low to combine.
  4. Transfer to a storage container or serving bowls, and refrigerate for at least one hour before serving.
  5. Serve with fresh raspberries and coconut or shaved chocolate.
Try serving it with raspberries and fresh shaved coconut, it's a delicious combination!

Tuesday, 2 June 2015

Marinated Eggplant

     Night school might be kicking my butt but at least I have eggplant! Not a consolation prize you say? Well you probably haven't tried marinated eggplant yet then. A couple of days ago, we bought a massive eggplant, approximately the size of my head. It was huge. I was leaning towards making baba ghanoush, but Ryan convinced me to try marinated eggplant. The beginning of the processes are similar, for both recipes you have to roast the eggplant. But once the eggplant is out of the oven, you stick it in a bath of herbs, olive oil and acids, wait a day or so and then you have mouth watering marinated eggplant to do with what you please. 


     Marinated eggplant works well as an antipasto along side an array of olives, grilled veggies, artichoke hearts and what ever else your little heart desires. I also love the addition of marinated eggplant on top of a simple margarita pizza. Because the eggplant is so soft after it's marinated, it works really well on pizzas, as well as on garlic toast or in a sandwich. 


Ingredients

  • 2 large Italian eggplants or about 6 Japanese eggplants
  • 1/4 tsp coarse sea salt
  • Red chili flakes, to taste 
  • 4 large cloves of garlic
  • a handful of fresh cilantro (large stems removed, washed)
  • 3 Tbsp red wine vinegar
  • 1 cup olive oil, or as needed

Preparation

  1. Preheat the oven to 450°F/230°C
  2. Wash and trim eggplant. Slice eggplant into quarters lengthwise (halves if using Japanese eggplants), then cut into half inch slabs lengthwise
  3. Finely slice or mince garlic and roughly chop cilantro
  4. Oil a baking sheet with olive oil and lay out eggplant. Sprinkle with coarse sea salt. 
  5. Roast eggplant in 450°F oven for 30-40 minutes, until eggplant is lightly browned and dry looking
  6. Let eggplant cool to room temperature
  7. Layer half the eggplant in a 8" round glass or ceramic dish without overlapping
  8. Sprinkle with half the garlic, red pepper flakes and cilantro and drizzle with vinegar
  9. Layer in the rest of the eggplant and sprinkle with the remainder of the garlic, red pepper flakes and cilantro
  10. Drizzle with olive oil until almost covered
  11. Cover the dish and refrigerate for at least 12 hours
  12. Let come to room temperature before serving

Monday, 11 May 2015

Collard Green Pesto with Kalamata Olives

     Not your traditional pesto...but then again basil can be so expensive when it's not in season. So all the more reason to use collar greens — they're cheap and they'll last you a lot longer. I like this recipe because it's a good way to use up any greens that have been sitting in the fridge and have lost a bit too much of their luster. Blitz them up and no one will ever know that they were on their way to the compost bin, at least not after you add garlic, lemon juice, kalamata olives and some quality olive oil.


     Because this pesto is so much cheaper than a normal basil pesto, you don't feel so guilty having extra sauce, after all we've got to get our greens in somewhere.


Serves: 4-10 (makes about 750mL)
Time: 20 minutes

Ingredients

  • 1 small bunch of collard greens (about 600g with stems)
  • 1/3 cup walnuts or pecans
  • 1/2 cup pitted kalamata olives
  • 2 cloves of garlic, inner leaf stem removed 
  • 1/2 cup panko bread crumbs
  • 1/2 cup nutritional yeast
  • 2 Tbsp lemon juice, about half a lemon, juiced
  • 1/2 cup to 1 cup olive oil
  • 1/2 cup to 1 cup water
  • salt and pepper to taste


Preparation

  1. In a large pot of boiling water, blanch collards about 2 minutes, or until bright green.
  2. Once blanched, cut away the stems, if not already done, and give the collards a rough chop.
  3. Toss collards in a food processor with all the other ingredients (yes it's that easy!), starting with the lower quantities of oil and water.
  4. Blend on low to begin, then transition to a higher speed as the pesto starts coming together.
  5. Add more oil and water until desired texture is obtained.
  6. Taste and season with salt and pepper.