Saturday, 26 October 2013

Veggie Pot Pie

Veggie pot pie is one of my favourite go-to recipes for every holiday: christmas, thanksgiving, easter, So I thought it was about time to share with the world my delicious pie recipe. It's a veggie pot pie, stuffed with all the classics: potatoes, carrots, tofu, mushrooms, greens... Delicious.
I've featured this pie at at many holidays and everyone enjoys it, vegetarians and meat-eaters alike.


Serves: 4-8

Ingredients


Pie Crust

  • 2 1/2 cups white flour (you can use a bit of whole wheat if you like)
  • 1/4 tsp salt
  • 1/4 cup cold vegetable shortening
  • 3/4 cup cold margarine, cut into cubes
  • 1/4-1/2 cup ice water

Pie

  • 1 block of firm or extra firm tofu*, rinsed, patted dry and cubed
  • 1 tbsp soy sauce, diluted with 2 tbsp water
  • 1 tbsp olive oil to pan fry
  • 2 tbsp nutritional yeast
  • 2 tbsp whole wheat flour
  • 1 tsp garlic powder
  • 1/2 tsp thyme

  • 1 tbsp olive oil
  • 1 cup, or 2 medium-small onions, diced
  • 2 large cloves of garlic, minced
  • 1 cup, or 3 stalks of celery, diced
  • 1 cup, or 2 medium-large carrots, diced
  • 1 cup, or 3 medium potatoes, diced
  • 8-10 sliced crimini mushrooms
  • 1/2 cup chopped kale, spinach, green cabbage or napa cabbage
  • 2 tbsp low-sodium soy sauce
  • 1/8-1/4 cup water
  • 1 cup frozen or fresh green peas


*To get a more "chicken-like" texture, try cutting the tofu the night before, then thawing it in the morning

Gravy


  • 1/2 cup nutritional yeast
  • 1/4 cup whole wheat flour
  • 1/3 cup olive oil
  • 1 1/2 cup water
  • 2 tbsp low sodium soy sauce
  • 1/4 tsp oregano and/or thyme
  • 1/4 freshly ground pepper, or to taste


Preparation


Pie Crust

  1. In a large mixing bowl, combine flour and salt.
  2. Cut the shortening into the flour mixture then add the cubed margarine and mix until you get a crumbly mixture, like a coarse corn meal.
  3. Slowly incorporate the ice water, until the mixture comes together as a dough. Start with a quarter cup and only add more if the dough is too dry.
  4. Form the dough into a ball, then cut into two halves, one roughly larger than the other.
  5. With plastic wrap, cover each ball and refrigerate until you are prepared to start filling the pie, at least 20 minutes.


Pie

  1. In a vary large pan or wok, coat with the olive oil and heat on medium.
  2. Drizzle the soy sauce mixture over the cut tofu, then add it to the pan.
  3. Fry the tofu, rotating it to so that most sides of the cubes are golden brown.
  4. In a medium bowl, mix nutritional yeast, flour, garlic powder and thyme.
  5. When the tofu is cooked, coat it in the mixture and set aside. Whatever doesn't stick to the tofu can be added the gravy later.
  6. In the same pan you used for the tofu, sauté onions, garlic and celery in the olive oil until the onions are translucent, about 5 minutes.
  7. Add the carrots, potatoes, and mushrooms to the pan and sauté for a couple minutes before adding the cabbage or greens.
  8. Add the soy sauce and water to the mixture, cover and steam until all the veggies are al dente, about 15-20 minutes. Meanwhile you can start the gravy (see below).
  9. Add the tofu and peas to the veggie mix and combine, then remove it from the heat.


Gravy

  1. In a small pot or sauce pan, toast the nutritional yeast and flour until aromatic.
  2. Add the olive oil and whisk until smooth.
  3. Slowly incorporate the water into the gravy, stirring until thickened.
  4. Stir in the soy sauce and seasoning.
  5. Remove from heat


  1. Roll out the larger portion of the dough onto a floured surface to about an 1/8". Place the dough in a 9" pie plate, leaving edges uncut.
  2. Mix the gravy in with the vegetable-tofu mixture, then pour onto the bottom pie dough, it will be heaping.
  3. Roll out the rest of the dough large enough to cover your pie.
  4. Roll the pastry onto the pie, and curl up the edges, crimping them with a fork or your fingers, removing any excess dough.
  5. Prick the top with a fork or knife.
  6. Bake in a preheated oven at 400°F for 30-40 minutes, uncovered, until the top is golden.
  7. Let the pot pie cool 10 minutes before cutting into it.


Serve with your favourite fall or winter side dishes and enjoy!


Wednesday, 11 September 2013

Peanut Butter Cups

School's back in session and we can all use a mid-week pick-me-up, so behold: chocolate peanut butter cups. If you've had Reese's peanut butter cups, you know what to expect. But these tasty cups may exceed you expectations. 
I make my peanut butter cups with dark chocolate chip, but feel free to use any chocolate you wish. As for the peanut butter, use natural peanut butter, or a similar product without all the added sugar which can make your peanut butter cups cloyingly sweet.


Makes: 12 cups (so make sure you've got 12 paper muffin cups on hand)


Ingredients


1 cup creamy natural peanut butter
1/2 icing sugar
1 1/2 cup chocolate chips
1/8 tsp salt (optional, but makes them taste better)


Preparation


Melt chocolate chips either on low heat on the stove top or in a microwave.
Spread half the melted chocolate evenly around the sides and the bottom of the 12 muffin cups. I find this can be done easily with a small spoon if you hold the muffin cup in you hand and spin it while spreading the chocolate around.
Place the paper muffin cups in a muffin pan and place in the freezer for a minimum of 20 minutes.
While the chocolate is hardening  in a small bowl cream the peanut butter with the sugar (can be sifted to avoid sugar chunks, unless you are too lazy like me) and salt. If the mixture is a bit stiff due to stiff peanut butter, you can add a dollop of margarine to the mixture.
In hardened-chocolate cups, distribute the peanut butter mixture evenly, spreading it flat with a spoon or by banging the muffin pan on the counter.
Refreeze the peanut butter cups for about 20 more minutes before spreading on the top layer of chocolate.
After all the chocolate has been smoothed out, refreeze the peanut butter cups for 1 hour.
Store in the freezer afterwards and let them thaw for a few minutes before nibbling.
Enjoy!


Tuesday, 20 August 2013

Overnight Oats

     When I need to leave the house in a rush to get to work in the morning, I make myself a batch of overnight oats the evening before. This simple but tasty recipe has at least one serving from all the food groups, which is much healthier than my usual: buttered toast. Plus it's incredibly easy. 
     I make my overnight oats with ground flaxseed, which is a good source of essential omega-3 fatty acids, antioxidants and fiber. All the more reason to add flax to your diet!
     Below, I've included my favourite preparation for overnight oats, but the possibilities are endless. I love blueberry oats, but I've also used dried dates, raspberries, strawberries and apple in place of the blueberries.


Serves: 1 (or 2 depending on how much you can eat for breakfast. I eat it all...)


Ingredients


1/2 cup of oats, I use half large flakes and half quick oats
2 tbsp ground flaxseed
1/2 banana 
1 cup non-dairy milk
1/2 tsp vanilla extract (omit if using vanilla flavoured milk) or 1 tbsp coconut milk
1/2 tbsp - 1 tbsp agave, maple syrup or honey
1 heaping tbsp unsweetened shredded coconut
1/4 cup chopped almonds or other nuts
1/3-1/2 cup blueberries or other berries or chopped fruit


Having my oats poolside,
while I prepare for a long day at work.

Preparation


In a small jar, combine oats and ground flax seed.
Add half of a banana and mash into the oat-flax mixture. The other half of the banana can be used in a second batch or eaten in the morning with the oats.
Next add the wet ingredients to the jar, including the milk, vanilla extract or coconut milk and sweetener of choice, as well as the shredded coconut and nuts. 
Screw on a lid and shake well to combine, making sure there are no ingredients sticking to the walls of the jar.
Finally, add in your fruit and mix gently, either with a fork or by shaking it.
Refrigerate overnight and enjoy in the morning!
Can be refrigerated for up to 4 days.

Sunday, 28 July 2013

Fresh Blueberry Muffins

Wow, it's been a while since I last posted. You'd think that I'd have more free time during the summer, but I've been working so much that I have even less time to cook than I did during the school year. On my last day off, I whipped up a tasty batch of blueberry muffins with some banana to change them up a bit. 

They turned out great! They were super moist from the banana and super tasty from everything else we put in them. And not to brag or anything, but they are good for you too: each muffin is packed with fruit and contains only about 3% of your daily fat and sodium.

Feel like a little nutrition lesson? 

One Tim Hortons classic Blueberry Muffin has 570mg of sodium, which is 38% of the sodium you need in a day, based on your Adequate Intake. 570mg of sodium equates to a 1/4 tsp of salt - that's in every muffin. I used that much salt in my entire batch of muffins! So one of my muffins has just less than 3% of your daily sodium. Now, I'm using Adequate Intake because that is the ideal value that you should be basing your diet on. But Nutritional Facts tables, like the one on your cereal box, base their percent daily value on the Upper Tolerable Intake Level (UL), which is the maximum daily intake.The UL for sodium is 2000mg; the Adequate Intake is 1500mg. This means that if you follow the Nutritional Facts tables, you could be consuming a lot more sodium than you need.

A Nutritional Facts table would tell you that your Tim's Blueberry Muffin only has 28% of your daily sodium, when in fact is has 38%. This is a problem. In Canada, over 85% of males and about 75% of females have sodium intakes above the UL, putting them at a higher risk of high blood pressure, hypertension, heart disease, obesity and cancer -  they don't include those warnings on Tim Hortons muffins, but maybe they should.  When in doubt, cut the sodium out. 

Speaking of which, here's my recipe:

Bake at: 375°F
Makes: 12-16 muffins

Ingredients


2 cups fresh blueberries, washed (~1 pint)
1 tbsp flour

1 ripe banana, mashed
1 tbsp ground flax seed with 2 tbsp water
1/8 cup vegetable oil
1 cup white sugar
2 tsp vanilla extract
2 tbsp vinegar
2 tsp baking soda

1 cup white four 
1 cup whole wheat flour
1/4 tsp salt
1 1/2 tsp baking powder

1/3 cup soymilk or other milk

Preparation


Preheat the oven to 375°F.
Wash blueberries, then toss in 1 tbsp of flour to coat and set aside. 
In a medium mixing bowl, mash the banana then add the ground flax and water and let the mixture sit for a couple of minutes while you measure out the rest of the ingredients. Next add the vegetable oil, sugar, vanilla, vinegar and baking soda to the banana-flax mixture and mix well.
Mix the dry ingredients together, then add this to the wet mixture and fold it in gently.
Incorporate the soy milk into the mixture until smooth, then add the blueberries.
Grease a metal muffin tray, or use muffin cups or a silicone muffin tray. Evenly distribute the batter in the muffin tins.
Bake at 375°F for 20-30 minutes.

Great for breakfast or a snack!


Tuesday, 2 July 2013

No-Knead Pizza Crust

Do yourself a favor: give homemade pizza another go (using our recipe of course). I know it can be frustrating when your pizzas don't look like those your cool friends got at that fancy Italian pizzeria in Brooklyn, but that's about to change. With this recipe you'll be able to make pizzas that are just as good, and make them vegan if you so choose. This technique makes the whole ordeal so much less of an ordeal that I want to eat the stuff every day! The recipe below is from Jim Lahey's book My Pizza, which along with My Bread is one of our favorite cookbooks. Available at fine bookstores everywhere.

Classic tomato pie

The dough

3 3/4 cups all-purpose or bread flour (whole wheat, white or a mixture)
1/4 teaspoon yeast
1 teaspoon salt (or less)
1 1/2 cups cool water

Preparation


Thoroughly blend all the dry ingredients in a large bowl.
Add the water and mix gently but thoroughly until all the flour is incorporated. If there is some flour left in the bowl, add more water, a few tablespoons at a time, until the dough is sticky to the touch. The dough needs to be fairly wet in order to rise properly.
Cover the bowl with plastic wrap or a damp towel and let it rise for 12-18 hours, until it has doubled in size and looks bubbly on the surface.
Flour your work surface and scrape out the dough; it should look stringy (glutinous) and wet.
You next need to shape the dough. With well-floured hands, fold the edges of the dough in towards the center four times - top, bottom, left, right - in whatever order you like. Then flip the dough over so that the seam side is down, and mould it into a nice round shape. If the mound is sticky, add another sprinkling of flour.
Let the dough rise for 1/2 an hour covered with a tea towel, then use a food chopper or knife to divide the mound into 4 equal parts for use on round pizza pans or stones. If you're using a large rectangular pan, 2 equal parts will fill 2 pans. Flour your hands and shape the parts into balls, then let them rise again for another 1/2 hour, until they have doubled in size. If you can poke the dough and it rebounds immediately, let it rise another 15 minutes. If you poke it and it retains a 1/4 inch depression, it is ready to use.

Cooking with a pizza stone

Things you'll need:
- a pizza stone, the thicker the better
- a pizza peel (those large wooden spatulas professionals use, but with a short handle)
- flour and cornmeal

If you're using a pizza stone (a technique we highly recommend), set the racks in your oven so that the stone is closer to the top than the bottom, but not right at the top. Put the stone in the oven and preheat the oven on bake at the highest temperature it can muster. You should start preheating the oven once you've shaped the dough, or around an hour before you intend to cook the pizzas. Ten minutes before you're ready to cook them, switch the oven to broil; this will super-heat the stone and should give your pizzas a nice crispy crust.
When the stone is ready, flour your pizza peel well and add a generous sprinkling of cornmeal (this is optional, but it makes sliding the dough off the peel much easier). It is important to flour your peel well or else the dough will stick to it and then this becomes an ordeal again. 
Take one ball of dough - add more flour to it if it's sticky - and stretch it. One of the best techniques for stretching dough is called 'knuckling': stretch the dough a bit with your hands until it is flat (be gentle!) then lift it on top of your clenched fists and stretch it gently with your knuckles. You can also stretch the dough by pulling and stretching it with your hands on the floured work surface. Try to stretch the dough immediately before you use it so that it retains its shape and moisture. And try to stretch it as evenly as possible, until it is very thin and about 10-12 inches across. Once the dough is shaped and is well-floured, lay it on the peel - you're ready for toppings!
The toppings are up to you (we'll give you some suggestions later). Once you have your pizza all dressed it's ready to cook. Use some good kitchen gloves to take the pizza stone out of the oven (it will be very hot). You can leave the stone in the oven but it makes this next step harder. Gently jerk the pizza peel forward and backwards to make sure that your pizza can move freely. If it can't, lift the edges of the dough and add more flour. Once you're ready, transfer the pizza with jerking motions onto the hot stone. This step is tricky because once the dough touches the stone it cannot be moved. Replace the stone in the oven and switch the oven to bake again.
The cooking time for your oven will vary depending on if you have a gas or electric appliance, how thick your pizza stone is and a dozen other factors like whether you and your oven have a friendly relationship (or perhaps something more?) Our oven is old, it's electric and it takes a while to heat up, and our pizza stone is about 1/2 thick. We bake our pizza for 7-10 minutes, then switch the oven to broil and cook the pizza until the crust is just this side of charred on top, and the ingredients are bubbling (usually only two or three minutes). Gas ovens often take less time to cook a pizza, so you'll have to do a bit of experimenting. Keep a close eye on, and detailed notes about, your first few pizzas and I'm sure they'll turn out great.

Cooking with a metal pan

Whatever the shape of your pan, start by oiling it generously - until you can trace lines in the oil with your finger, but don't add so much that you fry your pizza. If you're using a round pan, shape the dough as described in the directions for cooking with a pizza stone, above, but instead of placing the dough on the pizza peel, just stretch it and place it on the oiled pan. If you're using a rectangular pan, take one of your two pizza dough balls and stretch it to approximately the length of the pan. Lay it down on the pan, then gently stretch it to fill the pan width-wise. You will likely have to bake the pizza for a bit longer than if you were using a pizza stone, probably 10-15 minutes, then finish it with a couple minutes on broil. You can tell the dough is done when it pulls away from the edges of the pan and looks toasty. 

Thursday, 27 June 2013

Peanut Butter Cookies

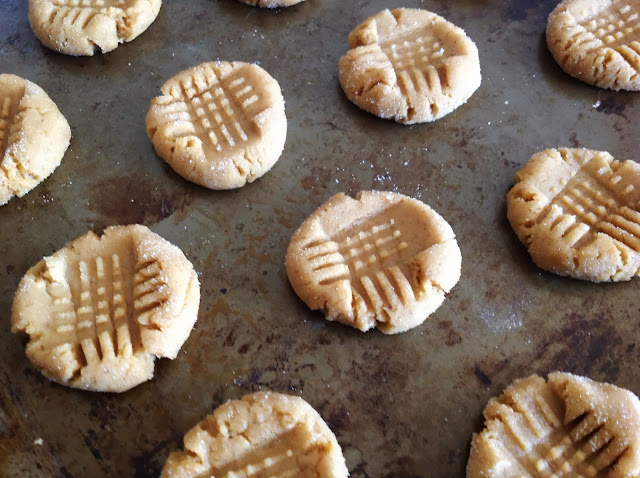
 It's been a very long time since I've had peanut butter cookies, probably since before I left home. But for some reason, I've always remembered peanut butter cookies being on the harder side of the cookie scale.  Well not these ones. These peanut butter cookies are super moist and super delicious. 
Since these cookies are made with flax, they have the added benefits of omega-3 and omega-6 fatty acids. And essential fatty acids in my cookies means I can justify having a third.


Makes: 32 cookies

Ingredients


2 cups brown sugar, lightly packed
1 cup margarine
1 cup natural, smooth peanut butter (No sugar added)
6 tbsp water + 2 tbsp ground flax
1 tsp vanilla extract
3 cups of flour
1 tsp baking soda
1/2 salt
white sugar for dusting

Preparation


In a jar or measuring cup combine water and ground flax, let sit for at least 3 minutes until the mixture thickens.
Meanwhile, in a large mixing bowl, cream together brown sugar, margarine and peanut butter.
Stir in the water flax mixture and the vanilla.
Add the flour, baking soda and salt to the batter, and mix until well combined.
Cover with plastic wrap and let sit in the fridge for at least 2 hours.


Preheat oven to 350°F.
Remove the batter from the fridge, and form golf ball size balls.
Roll the batter balls in white sugar (optional). then place on a lightly greased baking sheet.
Place the dough balls a few inches apart, then squish down with a fork.
Bake at 350°F for 12 minutes.
Remove from the oven and let rest on the baking sheet for an additional 5 minutes before transferring to a wire rack.
Let cool completely before eating.


Tuesday, 25 June 2013

Southern Comfort Food


I absolutely love comfort food! A few nights ago, we whipped up a batch of mac 'n' cheese with some garlic collard greens, sweet potato mash, vegetarian chicken fingers (store bought) and some tasty biscuits.
We've made mac 'n' cheese many times, however the recipe below is are go-to. It's rich and creamy, and really easy to make. As for the collard greens, the trick, as we've found, is to steam them, then quickly sautée in warm oil with garlic.
This meal is perfect for when you're having a craving for southern dinner food. All the goodness, but without all the animal products and butter! Yum!


Mac 'n' Cheese

Serves: 4-6

Ingredients


1 pound or 450g of pasta, cooked al dente

1 1/2 cup water
3/4 cup plain soy milk, or dairy-free milk
3/4 cup nutritional yeast
3 tbsp cornstarch
1 tbsp lemon juice
1/2 tsp salt + more to taste
1/8 tsp garlic powder
1/8 tsp onion powder
1 tsp turmeric powder
ground black pepper to taste


Preparation


Put all ingredients in the blender and pulse until smooth.
Taste for seasoning.
In a large pan, on medium heat, add all the cooked pasta to the cheesey-cheeseless mixture.
Cook for 5 to 10 minutes until the mixture has thickened.
Serve immediately with fresh ground pepper and salt if needed.
Add the remaining uncooked sauce to any leftovers so that tomorrow's leftovers will be as creamy as tonight's.


Garlic Collard Greens

Serves: 3-4

Ingredients


1 large bunch of collard greens
olive oil, about 1/8 to 1/4cup, enough to well coat the bottom of your pan
4-5 cloves of garlic, minced or sliced
pinch of red chili flakes
salt to taste
1 tsp lemon juice

Preparation


In a large skillet, heat olive oil with the garlic and chili peppers on low heat for 10-15min.
Wash the collard greens and cut into 1" strips.
Steam all the collards in a steamer basket in a covered pot with an inch of water at the bottom.
Steam for about 5 minutes, until bright green then drain, trying to remove as much water as possible.
Toss the collards in the warm olive oil mixture and sautée on low for 3 minutes. 
Mix the collards with the lemon juice and serve.


Sweet Potato Mash

Serves: 4-6

Ingredients


4 medium-large sweet potatoes or garnite yams
3 cloves of garlic
water
1/4 tsp salt
1/4 cup molasses, or to taste
pinch of allspice or asian 5-spice
1/2 tbsp paprika
scant 1/4 cup margarine
salt and pepper to taste

Preparation


In a large covered pot, bring salted water to a boil. 
Wash the sweet potatoes and cut into 1" chunks. Husk and remove the ends of the garlic, keeping the cloves whole. Add the garlic and the sweet potatoes to the boiling water.
Boil for about 10 minutes or until the potatoes are soft enough to mash.
Reserve about a cup of the cooking liquid, and drain the rest.
In the pot, mash the sweet potatoes adding the spices, and the margarine and cooking water until a smooth texture is obtained. You may also use an immersion blender to quicken the process.
Season with salt and pepper and serve along side your mac'n'cheese, collards and biscuits.


Monday, 10 June 2013

No-Bake Double Chocolate Torte


       Updating a favourite! Brought this delicious Chocolate Avocado Torte to a dinner party this past weekend and it was a huge success. I don't know how a chocolate torte could get bad reviews, but this one sure didn't fall short. The inspiration for this recipe came from "oh she glows' Chilled Double Chocolate Torte: The No-Bake Version" by Angela Liddon which I originally made in 2013 (oh how the time flies!). This torte is an excellent chocolate summer treat, and because it is no-bake, you don't need to brake a sweat making a delicious dessert.


Serves: 8-12
Time: 40 minutes + 2 hours (inactive)


Ingredients


No-Bake Crust

  • 2 cups pecans or walnuts, toasted
  • 1/4 cup cocoa powder
  • 1/4 cup maple syrup
  • 2 tbsp melted coconut oil (can also use vegan margarine, though the crust will be a bit crumbly)
  • 1/8 tsp salt


Chocolate Avocado Mousse 

  • 3 medium avocados, pitted and flesh scooped out
  • 1/3 cup soy milk or dairy-free equivalent
  • 1/2 maple syrup or honey
  • 1 tbsp almond butter or smooth peanut butter
  • 1 tbsp cornstarch 
  • 1/8 tsp salt, scant
  • 1 tsp vanilla extract
  • 1/4 cup cocoa powder
  • 1 cup of melted chocolate chips, semi-sweet


Preparation


Crust:

  1. Oil a 7-10 inch spring form pan, or use wax or parchment paper.
  2. In a food processor, pulse pecans or walnuts with other crust ingredients until thick and crumbly or cakey (a few larger nuts never hurt anyone).
  3. Spread the mixture evenly on the bottom of the spring form pan, and put in the freezer while making the mousse.


Mousse:

  1. Melt chocolate chips in a double boiler or in the microwave, stirring frequently.
  2. Meanwhile, in a food processor, purée all other mousse ingredients until smooth.
  3. Stir in melted chocolate chips and pulse until smooth and well combined.
  4. Remove the crust from the freezer and scoop the mousse on top. Smooth out with a smatula and freeze for at least 2 hours before serving chilled.
  5. To serve, let defrost for 5-10 minutes before cutting the torte, then replace the remaining torte in the freezer to not over soften the mousse.

Monday, 3 June 2013

Vegetable Quinoa Salad

Quinoa is a complete or high-quality protein, possessing all essential amino acids in the proper proportions and it's also a great source of carbohydrates, making this grain-like seed an excellent choice for vegetarians. I've used quinoa many times as a rice substitute in dishes like stir-fry and even in sushi. My most recent quinoa side dish was a warm, vegetable-packed, quinoa salad, which I served with yummy fried okra and tofu. This salad is very light, so it is ideal for the summer and although I initially served it warm, it is also excellent as a cold salad.

I've used red quinoa, but both red and white quinoa cook the same and can be used interchangeably. The instructions might seem a bit long, but really you are just making quinoa and cooking some vegetables. Not that difficult really, I've just tried to line everything out timewise for you.
For those really hot summer days, forget the baking, and barbecue the vegetables! After the vegetables are grilled, cut and toss with the quinoa in the same fashion.

Serves: 8-12 (as a side)

Ingredients


1 cup quinoa
1/2 cup vegetable broth + 1/2 cup water
A pinch of red chili flakes
3 medium cloves garlic
1/2 medium zucchini, quartered lengthwise
1 portobello mushroom
1 medium yellow pepper (orange or red works too), halved
4-6 spears of asparagus
3 cups kale, de-stemmed and chopped
1 green onion, greens and whites separately chopped
1/4 cup pine nuts (other nuts or seeds can be used)
1/8 cup fresh basil, ribboned
1 tbsp white or red wine vinegar
1/4 cup olive oil, divided
1 tsp sesame oil, divided
1/4 tsp ginger powder
salt and pepper to taste

Preparation


In a medium pot, cover quinoa with cold water, and let soak for 15 minutes.

Meanwhile, wash and cut vegetables. Place garlic (in their husk), quartered zucchini, portabello, yellow pepper halves (center down) and the asparagus spears on a large baking sheet.
Place baking sheet in the oven, set to 400°F and cook until vegetables are tender, up to 30 minutes depending on your oven.

After quinoa has soaked, rinse with cool water using a mesh strainer until the water runs clear. Transfer quinoa back to the pot, and add the 1 cup of liquid, 1/2 tsp sesame oil, a pinch of red chili flakes, the whites of the chopped green onion and a good grind of black pepper.
Put pot on medium heat uncovered. Bring to a simmer, then reduce heat to low and cook covered for 30-35 minutes or until water is absorbed.

Meanwhile, in a medium serving bowl, combine the other 1/2 tsp sesame oil with 1/8 cup of olive oil, the vinegar, the ginger powder, and a bit more pepper. Stir, then add in basil, green onion tops and pine nuts.
As the vegetables are nearing completion, you can take them out of the oven one at a time and begin adding them to the salad.
Remove the garlic first, it can be removed after about 20 minutes if you are ready. Depending on how cooked it is, you can either mash it in the bowl with the olive oil, or if it is more cooked, you can give it a rough chop, then add it to the bowl.
Remove the zucchini and slice about 1/4" thick, add to salad bowl.
Next, remove the pepper from the oven, remove its skin, chop the flesh into small squares, then add to the bowl.
Finally, remove the asparagus and the mushrooms, chop and slice and add to the salad.

After about 30 minutes of cooking, when the quinoa has absorbed all the water, remove the pot from the heat and let steam for 5 minutes.
After 5 minutes of steaming fluff up the quinoa and let it cool slightly before transferring it to the salad bowl.

In the quinoa pot or another pan, quickly wilt the kale, by stirring the kale on medium heat until bright green and slightly soft, about 3-5 minutes.
Add kale to the salad bowl. Stir and combine. 
Add the remaining 1/8 cup olive oil to the salad, mix again. 
Taste and season with salt and pepper.


Friday, 24 May 2013

Vegan Cheesecake

I've made this dessert for my mom's birthday for the past two years. She loves cheesecake and loves this vegan version too. Unlike regular cheesecakes that can weigh you down, this version in light and protein rich. You can feel good about yourself after eating it, so go ahead and have an extra piece. Really, this cake is a complete source of protein, using pecans as a crust with a tofu/tofutti cream cheese filling. You don't need to worry about missing out on your meat substitute food group if you're having this baby for dessert!
I've made this recipe a total of three times, and every time I make it, I play with the toppings. I've used apples in the fall, raspberries and strawberries and my latest was blackberries and strawberries.


How delicious does this look? Untouched and ready to be eaten.

 Ingredients

2 Cups strawberries (1/2 quart) to 1 Cup blackberries (1/2 pint)
I only cooked the berries for a few minutes (the strawberries for
 ~5 minutes and the blackberries for ~3 additional minutes on
medium low heat) to keep them fresh 

Crust
3 cups pecans (2.5 if chopped)
4 tbsp white sugar
3 tbsp whole wheat flour
6 tbsp melted margarine

Filling
1 package firm (or extra firm) tofu, rinsed
2 tubs tofutti cream cheese
2 tbsp soy milk (or other varieties)
2 tbsp lemon juice
1 tbsp vanilla extract
1/3 cup brown sugar, packed
1 tsp cinnamon (optional)
5 tbsp whole wheat flour

Topping
2 tbsp margarine
3 cups fruit, such as mixed berries (see photos for more information)
2 Cups raspberries (1 pint) to 1 Cup strawberries
I made this this cheese cake last year and travelled on the bus
with it from Toronto to North Bay to surprise my mom for her
birthday. It was refrigerated for at least 24 hours, which is why
the topping is clearly firmer than the previous, which only had
time to chill for about 4 hours.
1 cup brown sugar, packed
1/4 cup corn starch dissolved in 1/4 cup cold water


Preparation


Crust
Preheat the oven to 400°F.
In a blender or food processor, pulse pecans, sugar and flour until crumbly (this can be challenging if using a blender, and may take some patience and frequent stirring).
Stir in melted margarine with a fork until well mixed.
Poor mixture into a 9" spring form pan and press down firmly with a fork or spatula, distributing the mixture evenly to about 1/4 inch thick. 
If you are using a smaller spring form pan, you may want to consider continuing the crust up the sides of the pan.
Bake crust at 400°F for 13 minutes.
Let crust cool at room temperature for 5-15 minutes.
Reduce oven heat to 325°F.


McIntosh apples (3 sliced)! I didn't
have a spring form pan at the time, 

so I used a large pie plate instead.

Filling
In a medium mixing bowl, crumble tofu, and add all other ingredients.
Mix together roughly, then transfer to the food processor or blender, or use an immersion blender, and blend until smooth.
Spread the filling evenly onto the crust.
Bake at 325°F for 70 minutes.
After 70 minutes, turn the oven off, leaving the cheesecake in the oven for an additional hour.
Remove from the oven and let cool to room temperature on a wire rack before cooling in the fridge.
Let chill for at least an hour before making the topping.


Topping
Wash fruit and slice to desired thickness or leave smaller berries whole.
On medium low heat, melt margarine and toss with firmer fruit. Sauté for a few minutes, until tender, before adding any additional softer fruit. 
When the fruit are at the desired tenderness, and they have produced a good amount of liquid, stir in the brown sugar and cook on medium low until bubbly, stirring lightly when needed.
Add the corn starch-water mixture and stir constantly until thickened.
Remove from heat and let cool slightly.
Top cheesecake with topping and let chill in the fridge for at least 2 hours. The longer it chills, the firmer it will become.

And if ever short on time, you can always switch between the fridge and the freezer when chilling this delicious cheese cake...I've never been a very patient person when it comes to cake.

Enjoy!

Wednesday, 15 May 2013

Tasty Tropical Fruit Muffins


One of Ryan’s favourite muffin recipes from his mom. Muffins are perfect for the morning; they are fast, easy and nutritious.


Vegetarians and vegans need to be especially cautious of B12 deficiencies, which is why I like to add the optional nutritional yeast to this recipe. The nutritional yeast doesn't affect the texture or flavour of the muffin at all, but it’s a great way to incorporate some additional B vitamins into your diet. Nutritional yeast is an excellent source of vitamin B12 and also thiamine. If you decide to add the ½ cup of nutritional yeast, each muffin would have about 50% of your daily Vitamin B12 plus a bit extra depending on the fortification of your soymilk.

Bake at: 400°F
Bake Time: 25 minutes
Makes: 12 muffins

Ingredients


1 cup all-purpose flour
1 cup whole wheat flour
2 tsp baking powder
1 tsp baking soda
¼ tsp salt
½ cup shredded coconut, unsweetened
½ packed brown sugar
(Optional: 1/2 cup nutritional flakes)

1/8 cup water
1 cup soymilk, or other variety of milk
1 cup mashed banana (2-3 bananas)
¼ cup melted margarine
2 tsp vanilla
1 can crushed pineapple, juice removed

Preparation


Preheat oven to 400°F.
Combine all dry ingredients in a large mixing bowl.
In a separate bowl, combine all wet ingredients.
Pour wet ingredients into the dry bowl and stir until moistened.
Spoon muffin batter into a greased pan or a silicone muffin tray.
Sprinkle about a handful’s worth of extra coconut on top of the muffins.
Bake for about 25 minutes, until golden brown and the cake tester comes out clean.
Enjoy for breakfast or for a snack!

Friday, 10 May 2013

Mom's Rhubarb Crisp

At my parent's place, in the back yard, behind our shed, is a rather large rhubarb plant. When we first moved there it was tiny, but it has since expanded its territory. Once the rhubarb is large enough, it's harvested for one of our favourite rhubarb dishes─the crisp.
Perfect for a warm spring evening with family and friends

This is my mom's recipe, originally scribbled at the back of one of her dessert cook books. Since her rhubarb wasn't up yet last weekend when I visited, we decided to use up last year's batch of frozen rhubarb. If you're using frozen rhubarb like we did, try and defrost it first, because it tends to produce a lot of water that needs to be drained off before baking. 
I've doubled the recipe from my mom's original because there is just no use in making a single batch. In all my years of eating this dessert, I don't believe I've ever seen my mom make a single batch.

Serves: 6
Bake at: 350°F

Ingredients


6 cups rhubarb
2 tbsp flour
1 cup sugar
2 tsp cinnamon
1/4 tsp salt
2 Tbsp water (omit if using frozen)
optional: 1 1/2 cup diced strawberries

3/4 cup margarine
3/4 cup flour
1 cup brown sugar, packed
1 cup oats

Preparation


Preheat the oven to 350° F.
Mix first 6 (or 7) ingredients in a large bowl.
In another bowl cream margarine with sugar, then mix in flour and oats.
Lightly grease a 9"x13" glass pyrex dish.
Evenly distribute the rhubarb mixture in the glass dish.
Distribute crumble on top of the rhubarb equally. You can either pat it down a bit or leave the mixture loose.
Bake at 350°F for 40 minutes or until top is golden brown and the rhubarb is tender.
Let cool.
Serve at room temperature with vanilla ice cream, and enjoy!


Wednesday, 8 May 2013

Crêpes (a vegan recipe and my dad's not-so-vegan recipe)

Growing up we never had pancakes, only crêpes in my house. I remember the first time my dad attempted making pancakes, he kept squishing them with the spatula because they kept rising. He's quite the silly Frenchman. 
I'm going back to my French roots with this recipe, a sweet crêpe with all the fixings. 
Crêpes are typically made with eggs, which act as a great binder, but as you know, we are egg free, so here is our favourite vegan crêpe recipe.

We were a bit naughty and topped our crêpes with some of our leftover ice cream from the night before
Serves: 2

Ingredients


1/2 cup soymilk
1/2 cup water
1/4 cup melted margarine
1 Tbsp sugar
1 1/2 Tbsp maple syrup
1 cup white flour
1/4 tsp salt

Assorted fruit, margarine, maple syrup, brown sugar, ice cream, and whatever else you fancy for serving

Preparation


Whisk all ingredients in a bowl until smooth.
Refrigerate for at least 30 minutes, up to 2 hours. 
Heat a non-stick pan on medium heat, melt some margarine in it, then ladle in the crêpe batter. Cook on one side until golden, flip and cook on the other side.
Place prepared crêpes on a plate in the oven on its lowest temperature to keep them warm while you prepare the rest of them, alternatively you can keep the prepared crêpes covered with aluminum foil or another plate.
When all the crêpes are prepared, serve with all your favourite fixings, and enjoy!


Just in case you're not vegan, and want my dad's excellent crêpe recipe, here it is:

Dad's (non-vegan) Crêpes

Serves: 5-6
3 cups flour
4 cups milk
4 eggs
2 tsp vanilla
2 tbsp sugar

Whisk it all together and follow the above directions for frying (no need to refrigerate).

Monday, 6 May 2013

Vegan Ice Cream (Without an Ice Cream Machine)

Vegan ice cream has always been a bit too expensive for use, and as students living in a small one bedroom apartment, an ice cream machine is not feasible nor is it worth the cupboard space. So, low and behold, I found a way to make vegan ice cream à la cheap and without a machine. 

Freeze time: ~3 hours
One messy bite away

Ingredients


1 can coconut milk, high fat
1 can's worth of soy milk,
1/2 cup sugar
1 tsp vanilla extract or 1 scraped vanilla bean
pinch of salt

Preparation


Refrigerate coconut milk overnight before using it.
Add all Ingredients into a medium-large plastic,freezer safe container and mix thoroughly either with a whisk or with an immersion blender. 
Place uncovered container of ice cream liquid in the freezer for 30 minutes.
Scrape the frozen ice cream from around the edges of the container and mix again thoroughly.

Continue freezing for 30 minutes, scraping and mixing, then repeating until frozen.

Best consumed while fresh, which is much softer. Alternatively, if left for several hours in the freezer, let thaw for at least 10 minutes before serving..

We made some delicious ice cream sandwiches with my chocolate chip recipe, modified with the addition of 1/3 cup of cocoa, while spreading the cookie batter out a bit thinner and removing them from the oven a minute early


Wednesday, 1 May 2013

Meatless-Meatloaf

Finally done all my exams! So it's about time I get to publishing the tasty recipes I've made, and kept to myself over the last few weeks.
I've been wanting to experiment and make vegan meatloaf for some time now. Ryan has never had meatloaf, and my parents rarely ever made it when I was a kid. So it's about time I vegan-ize this meat heavy dish. 
There are two things that all great meatloaves need: soy sauce and ketchup. If you are out of either of these ingredients, go out and pick up some supplies. I'm sure you could make the dish without them, but my loaf needs them.
I knew that I wanted to use TVP, but I also wanted to incorporate lentils. Both are very common in vegetarian meatloaves, and together they give texture and complexity to the base. As for the rest of the goodies, creative freedom is always welcomed. I used some of my favourite seeds, herbs, and of course mushrooms.

Serves about 6
Preheat oven to 375°F.

Ingredients


1 2/3 TVP (textured vegetable protein, granules)
1/2 cup dry red lentils, triple rinsed
1 cup boiling water
1 cup hot vegetable broth
1/2 cup ketchup
2 tbsp soy sauce
1/2 cup quick oats
1/2 cup panko or bread crumbs
1/4 cup ground flaxseed
1/4 cup sunflower seeds or chopped walnuts (optional)
2 tbsp nutritional yeast
1/2 medium onion, minced
4-6 medium crimini mushrooms, chopped
1 tsp garlic powder
1/2 tsp onion powder
1 tsp  basil
1 tsp oregano
1 tsp chopped chives

BBQ sauce: use your favoutite or combine 1/3 cup ketchup, 1 tbsp soy sauce and several dashes of chipotle smoky hot sauce and make your own BBQ sauce

Preparation


Preheat the oven to 375°F. 
Grease a 9x5 loaf pan.
In a medium bowl, combine the TVP and the lentils with the water, broth, soy sauce and ketchup. Mix to combine and let sit for 10-20 minutes.
Once all the liquid is absorbed, add remaining ingredients and mix well.
Pack the meatloaf mixture into a loaf pan and press down firmly on mix.
Bake for 30 minutes.
Remove from oven and lather on the BBQ sauce.
Bake for an additional 10 minutes.
Let cool a minimum of 10 minutes before cutting into the loaf.